WP Texas - Email Configuration
v 0.9g - 2019/10/30

This guide covers the configuration settings for desktop and/or mobile clients, and resetting email account passwords.
Webmail access is available at webmail.wptexas.com.
You may sign in using your email address (e.g., [email protected]) and password.
Contents:
Email Client Settings
* IMAP using TLS encryption/port # is preferred for a consistent experience across desktop clients and webmail.
Receiving
IMAP/POP3 Server: mail.wptexas.com
Incoming Port (IMAP): 143 (TLS) or 993 (SSL)
Incoming Port (POP3): 995 (SSL)
Sending
SMTP Server: mail.wptexas.com
Outgoing Port: 587 (TLS) or 465 (SSL)
Configuration Guide (MS Outlook)
MS Outlook 2010 shown. Settings should be similar in other email clients.
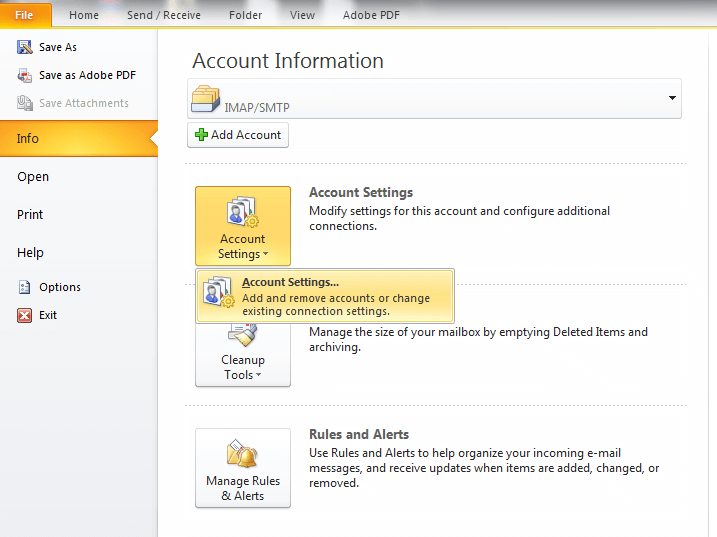
1. Under the File menu (top left), select Info -> Account Settings.
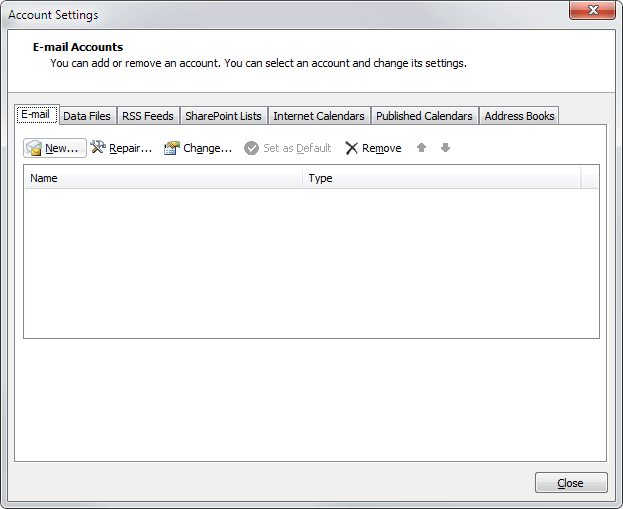
2. Under Email, select New... OR select an existing account and Change... (Skip to Step 5 if editing an existing account).
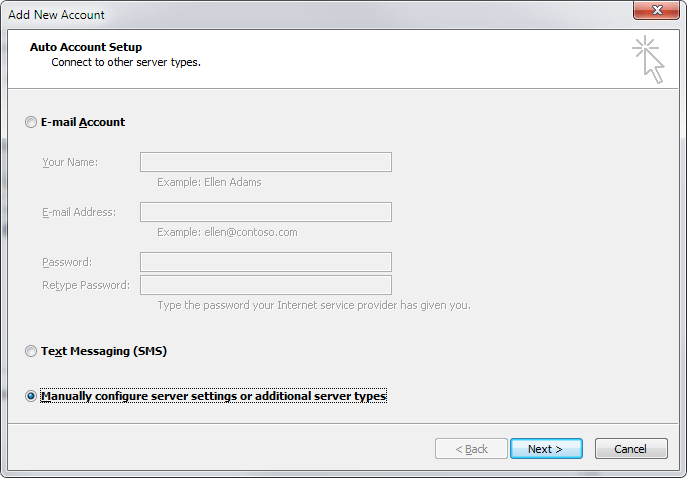
3. Select Manually configure server settings or additional server types, Next.
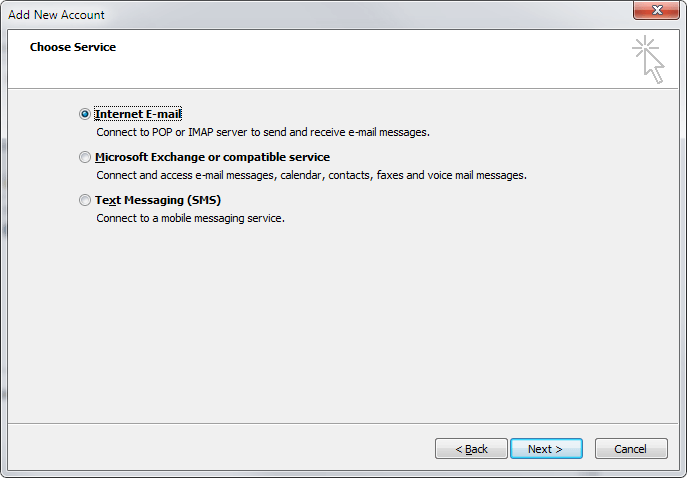
4. Select Internet Email, Next.
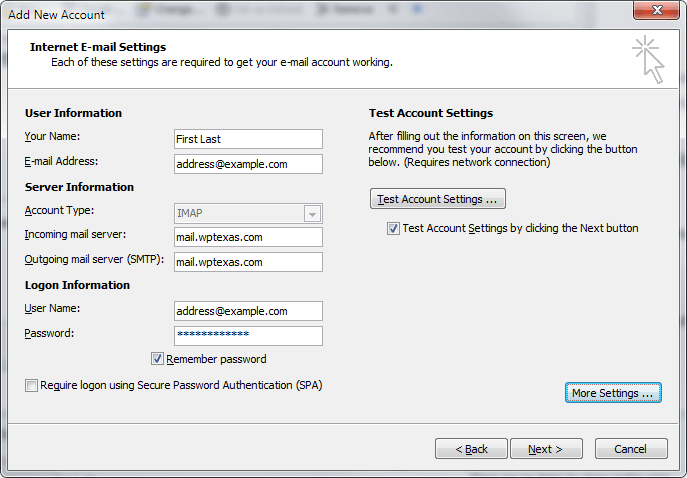
5. Enter settings as shown, replacing First Last with your name, [email protected] with your email address, and inputting your password under Logon Information. Select More Settings....
Note: If your Account Type is POP3 for an existing account, you won't be able to change it. Please review the settings for POP3 in Step 7.
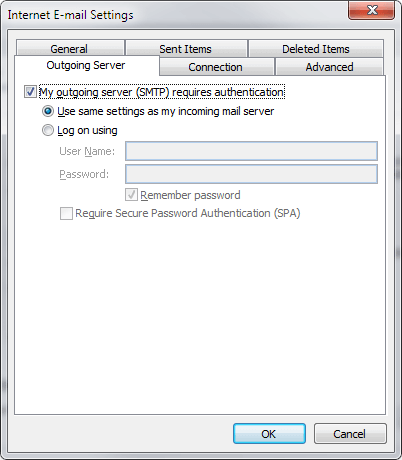
6. Under Outgoing Server tab, Select My outgoing server (SMTP) requires authentication, Use same settings as my incoming mail server.
7. Under Advanced tab, enter settings as shown (type of encrypted connections, Outgoing server (SMTP)), and set Server Timeouts slider to the maximum (10 minutes). Select OK to save the settings.
Note: For POP3 accounts, set Incoming server (POP3): to 995, and select the box below for SSL. You may also want to modify settings under Delivery to retain messages on the server for a period or until they are deleted in Outlook.

8. On the Internet Email Settings screen, select Next. A Test Account Settings screen should appear. After a short while, Log onto incoming mail server (IMAP) and Send test email message under Tasks should show Completed. Select Close and then Finish to exit the account dialog.
Your configured email account should now show on the Account Settings screen with type IMAP/SMTP. If you want the account to be your default sending account, highlight the account entry and select Set as Default. A check mark will then appear next to the account record. Select Close.
Outlook will switch to your configured account and sync mail items. It could take a while, depending on the amount of mail items in your account. Leave Outlook open while the contents sync (displayed at the bottom right as a progress bar). Congratulations, your account is configured to send/receive mail via Outlook!
Password Reset Guide
There are two methods to reset/change your email account password:
If you know your current password...
1. Go to webmail.wptexas.com.
2. Log in to your account using your email address (e.g., [email protected]) and password.
3. In the upper right, your email address is shown as a drop-down menu. Select Password & Security from the menu.
4. Enter your new password and confirm by entering again below. Select Save. If successful, a message is displayed, and your password has been updated. Select Webmail at the top left to return to your inbox.
If you do not know your current password...
Important! These steps require that you have previously set up Contact Information in your account to receive account notifications and password reset confirmations. See the section below on setting up Contact Information. If you do not have Contact Information set up, and do not know your current password, you will need to contact [email protected] to have us set a new temporary password for your account.
Use of the Reset Password function is currently unavailable. It does not send the security code required to create a new password. We will update this guide when the issue is fixed and self-service password resets become available.
1. Go to webmail.wptexas.com.
2. Select Reset Password.
3. Enter your email address for Username and select Reset Password.
4. Enter your contact email previously set up in Contact Information. Select Send Security Code.
5. Check your contact notification email for the security code. Once you have received the code, enter it into the Security Code box and select Submit.
6. To be completed...
Important! Contact Information Setup Important!
1. Go to webmail.wptexas.com.
2. Log in to your account using your email address (e.g., [email protected]) and password.
3. In the upper right, your email address is shown as a drop-down menu. Select Contact Information from the menu.
4. Enter a contact email address in the first box. Your contact email should not be the same as your account address. You will need to be able to access the contact email account (e.g., Gmail, etc.). Select Save.
5. A confirmation screen appears. You may select Go Back and make additional changes, or select Webmail at the top left to return to your inbox.
Questions? Please contact us at [email protected].